A Breeze application can talk to an ASP.NET Web API 2 OData data service. We show how in this “BOWA” Web API OData Todo Sample which you can download from here.
Many thanks to Javier Calvarro Nelson who works on the Microsoft Web API OData team. This sample was Javier's idea, he drove it, and he wrote much of it, most importantly the server-side OData controllers.
Open in Visual Studio 2013/2015 (It may open in an earlier VS but make sure you’re up to the latest because this sample is built for Web API 2 and EF 6).
Build … let it get its dependent packages from NuGet. Run without debug (Ctrl-F5) or with debug (F5); make sure VS tells you that it built successfully.
Your default browser should launch a new tab and you should see the familiar ASP.NET MVC template home page

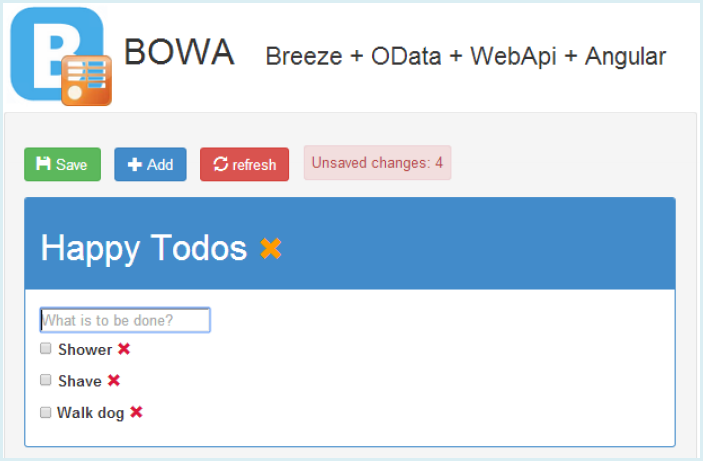
Click on BOWA … wait for it (the database is being created) … and you should see a list of TodoLists appear, looking something like the BOWA page pictured above.
Add some TodoItems, delete some, edit some, edit a TodoList title (just click in it). The number of unsaved changes will appear in the rose-colored box next to the buttons. Click save; a green “toast” message should float from the top-right telling you that the save was successful. The “Save” button is disabled.
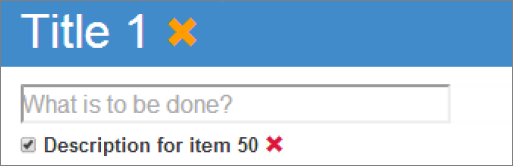
Click the “Add” button to create a new TodoList. A panel appears between the buttons and the existing TodoLists.
After making some changes, click “Refresh” to discard them and refresh all data from the server.
Have fun.
This sample is a Single Page App” (SPA) within an ASP.NET MVC application. The MVC application was generated from the Visual Studio 2013 “MVC” template with both the “MVC” and “Web API” boxes checked.
The template scaffolds a web application project with over 30 nuget packages. We updated the “EntityFramework” package to version 6.0.2 and added the “Microsoft.AspNet.WebApi.OData” and “Microsoft.Data.Edm” packages to round out the server-side portfolio.
We discuss additional client-focused packages below.
MVC plays no substantive role in this demonstration. We could have written “BOWA” with no more than a simple index.html page. We went the MVC route for two reasons. First, MVC is a comfortable, familiar way to start for many .NET developers. The MVC template gets the ball rolling without surprises.
Second, many of you have existing MVC applications. You probably won’t convert them overnight to SPA … if ever. But one or two Views might be more effective as SPAs and you wonder if it is hard to seamlessly weave SPA pages into your MVC application. This sample proves it’s easy.
All we did was add a razor page named “BOWA” (~/views/home/bowa.cshtml) to the scaffolded MVC app. BOWA is our SPA host page, providing three essential services:
The container takes one line of HTML:
<div data-ng-app="app" data-ng-include="'/app/todolists.html'"></div>
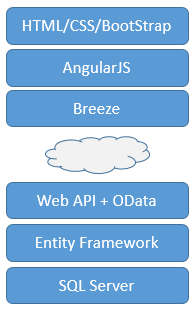
Everything the user sees takes place inside that shell <div/>. Its contents are constructed dynamically on the client in HTML and JavaScript with the help of AngularJS and Breeze.
AngularJS provides the data binding and other presentation infrastructure behind the user experience. The app adopts a "Model-View-ViewModel" (MVVM) style for separating layout (HTML) from logic (JavaScript)
On the server stack is your business model and data, communicated to the client with Web API and OData, queried and stored with Entity Framework and SQL Server.
We’ll start at the back on the server and work toward the user.
This is a two-entity application for tracking stuff you need to do. There are TodoLists each of which holds a collection of TodoItems. These ideas are represented by two types defined in the Model folder. Both are simple POCO classes … although it’s worth pointing out that the TodoList.Title and TodoItem.Description properties are adorned with DataAnnotation attributes.
[Required, MaxLength(30)]
public virtual string Title { get; set; }
...
[Required, MaxLength(60)]
public virtual string Description { get; set; }
These attributes prescribe “required” and “maximum length” validation rules that Entity Framework (EF) enforces on the server during an insert or modification.
We’ll soon ask EF to generate metadata about this model. When it does, EF includes these rules in that metadata. Downstream, Breeze reads the metadata, finds these rules, and applies them on the client. We can give the user immediate feedback about these requirements without writing any code for the purpose … a point we’ll take up at the appropriate time.
The Entity Framework DbContext is in the Model folder as TodoListContext.cs. It is simplicity itself:
public class TodoListContext : DbContext {
    // database initialization removed for exposition
    public DbSet<TodoList> TodoLists { get; set; }
    public DbSet<TodoItem> TodoItems { get; set; }
}
Feel free to mash the sample data. The database initializer re-creates the database every time the server starts.
The ASP.NET team recommends a separate Web API ODataController for each entity type. You’ll find them in the Controllers folder as TodoListsController and TodoItemsController.
Naming matter in Web API. Consider the
TodoListsController. The OData Web API controller root name (“TodoLists”) must correspond to the property name for one of theDbSets in theDbContext(TodoLists). Check!All Web API controller names must end in the word “Controller”; the Web API routing system depends on this convention. Check! Our controller is well named.
Each controller has four asynchronous save methods that should implement the HTTP operations: PUT, POST, PATCH(MERGE), and DELETE.
You don’t have to create every method for every type. Define just the save action methods for the operations you support. See also the discussion of the “BatchHandler”.
These two controllers also have three query action methods. The most important, from a Breeze perspective, is the parameterless HTTP GET action that returns an IQueryable of the controller’s namesake type.
// TodoListsController:
[Queryable]
public IQueryable<TodoList> GetTodoLists()

// TodoItemsController:
[Queryable]
public IQueryable<TodoItem> GetTodoItems()
Our application’s breeze queries target this endpoint. You write a Breeze EntityQuery with filter, paging, ordering, and projection (“select”) criteria. Web API OData extends the base IQueryable with these criteria before executing it. For example, you might write
return breeze.EntityQuery.from('TodoLists')
      .where('Title', 'startsWith', 'T')
      .take(3).orderBy('title')
      .using(manager).execute()
      .then(success).catch(failure)
Our Breeze client can accomplish all of its appointed query tasks with this single endpoint. There is no need to implement the other two; they are bonus material for your OData study.
While the “bonus” methods serve no useful purpose in this application, there are times when a dedicated controller method performs a function you either cannot or do not want to perform with a client-specified query. Fortunately, you can aim Breeze at any HTTP GET endpoint. For example, the following query …
breeze.EntityQuery.from('TodoLists(5)/TodoItems')
      .using(manager).execute()
      .then(success).catch(failure)
… returns a JavaScript array with four
TodoItementities (but not the parentTodoList!). Breeze merged the data for all four into the manager’s cache.
We discussed it. Some of us wanted them … badly. These Web API controller implementations make us cringe. But those who argued that the sample had enough complexity without upping the concept count carried the day.
If these concerns matter to you, we trust that you know how to refactor and that you will cut us some slack. It is a demo.
Web API routing directs client requests for data to the proper controller methods. There are several ways to specify those routes. This application does it with global configuration when the server application launches.
Open the WebAPIConfig.cs file in App_Start and look for the following code:
config.Routes.MapODataRoute(
        routeName: "odata",
        routePrefix: "odata",
        model: EdmBuilder.GetEdm<TodoListContext>(),
        batchHandler: new DefaultODataBatchHandler(GlobalConfiguration.DefaultServer)
);
MapODataRoute configures Web API OData routes. The route specification defines a “routePrefix” for finding Web API controllers and their action methods. It associates the route with an “Entity Data Model” (EDM) that describes the schema for the data model you want to expose on the wire. And it specifies a handler for $batch requests.
A “routePrefix” is a URL path segment that OData expects to see prefixed to the name of the resource of interest.
The name of the resource is the same as the root name of the targeted OData controller. For example, the resource name “TodoLists” corresponds to the TodoListsController described above. Prefix that with “odata” +’ /’ and you get the site-relative resource path, “odata/TodoLists”.
The absolute path is the site base URL plus the resource path. If our site base URL is
http://localhost:55802/, the absolute path to theTodoListsControllerishttp://localhost:55802/odata/TodoListsCase matters. “TodoLists” is correct; “todoLists” is not.
The EDM is the other side of the route equation … and we turn to it now.
The EDM describes the schema for the model targeted by requests that follow a route. If a client makes a request to the odata/TodoLists resource, the route EDM had better describe an EntitySet named “TodoLists”.
Breeze also needs the EDM as a source of metadata. Breeze requires that metadata to understand the schema for entities on the client. Metadata tell Breeze which types to track, what properties they have, which property is the key, the property data types, whether they return scalar values or collections of values, etc.
A Breeze client can ask an OData source for metadata.
In our example, the client sends a GET request to
http://localhost:55802/odata/$metadata.
The OData source satisfies the request by extracting metadata from the route’s EDM and forwarding it to the client as XML.
The Web API OData literature recommends that you define your EDM using the
ODataConventionModelBuilder as seen in this Microsoft tutorial. A nice feature of this approach is that you can cherry pick the EntitySets you want to expose to the client. You don’t have to send metadata about every set in your DbContext.
Sadly, at this time, the EDM generated by the ODataConventionModelBuilder omits critical schema information. Specifically, it fails to identify the foreign key properties that help define the associations between entities. Breeze cannot maintain the relationships among entities on the client without knowing the foreign key properties.
Microsoft has acknowledged the oversight and planst to correct it in a future version of Web API OData. They haven’t committed to a date but it will happen.
Fortunately you can build an EDM with complete metadata using the Breeze Labs EdmBuilder class located in the App_Start folder.
You can add it to your own project with nuget:
Install-Package Breeze.EdmBuilder. You can also download it from github and put it in your Web API “App_Start” folder.
The EdmBuilder is a static class with methods to generate an EDM from a DbContext. This EDM satisfies both the route’s need for a model and Breeze’s need for complete metadata. Use either the GetCodeFirstEdm or GetModelFirstEdm as appropriate for the way you built yourDbContext
The generated EDM describes every type in your DbContext.
Perhaps you don’t want to publish metadata about every type nor support OData access to every type. A good workaround is to define an alternative
DbContextcovering just the part of your model that you intend to expose through OData. You don’t have to use thatDbContextfor data access; you only need it to generate the EDM.
Batching is a Web API feature that allows a developer to pack what would be several API requests one HTTP consolidated request and receive a single HTTP response with embedded responses to the individual requests. Javier Calvarro Nelson wrote a great post about it on the ASP.NET site.
The “batchHandler” routing parameter is optional for many OData applications. It’s required to support a Breeze application. The Breeze saveChanges method sends a change-set in a multi-part request to the OData “$batch” endpoint when your client is configured (as we recommend) to use the Breeze WebApiOData” DataService adapter described below.
Breeze
saveChangesdoes not target the controller save endpoints directly. But the default “$batch” handler, shown in this sample, does re-distribute the sub-requests to these endpoints. As long as you configure the route for theDefaultBatchHandler, you must write the controller-level action methods for the save operations you want to support.
So far we have a vanilla WebApi OData service with batch support. There is no Breeze code on the server … with the single exception of the EdmBuilder, a temporary expedient pending Microsoft’s update to its own ODataConventionModelBuilder.
In this section we’ll show you where to find things on the client and explain some of our design choices.
We’re not going to teach you AngularJS. You may want to stop and learn about AngularJS from other sources if you aren’t familiar with the AngularJS terms “module”, “service”, “controller” and “dependency injection”.
We’re not trying to teach Breeze either. You may want to stop and learn about Breeze elsewhere in the documentation if you lack a basic understanding of what Breeze is and how it works. The terms “entity” and “EntityManager” should be familiar to you.
It’s time to add Breeze and AngularJS to the HTML/JavaScript client. You can get everything you need for this sample with these additional NuGet packages:
AngularJS.Core    // AngularJS
AngularJS.Animate // AngularJS animation library
Breeze.AngularJS    // adds Breeze.AngularJS.Directives and Breeze.Client packages
datajs            // AJAX OData service access
toastr            // Pop-up toast messages
Remember that the MVC + WebAPI starting template loaded a few other client packages too such as bootstrap and jquery.
These packages add JavaScript and CSS files to the project. Now we have to get them down to the client.
In this sample we load script files at the bottom of the host razor page bowa.cshtml.
@section scripts
{
   <!-- 3rd party libraries -->
   <script src="~/Scripts/angular.js"></script>
   <script src="~/Scripts/angular-animate.min.js"></script>
   <script src="~/Scripts/datajs-1.1.1.js"></script>
   <script src="~/Scripts/toastr.min.js"></script>

   <script src="~/Scripts/breeze.debug.js"></script>
   <script src="~/Scripts/breeze.angular.js"></script>
   <script src="~/Scripts/breeze.directives.validation.js"></script>

   <!-- application scripts go here -->
}
We’re letting ASP.NET bundling load our CSS. In App_Start/BundleConfig.cs you’ll find that we’ve extended the “css” bundle to include CSS files associated with some of these 3rd party libraries:
bundles.Add(new StyleBundle("~/Content/css").Include(
          "~/Content/bootstrap.css",
          "~/Content/toastr.css",
          "~/Content/breeze.directives.css",
          "~/Content/site.css",
          "~/Content/todo.css"
          ));
The todo.css and site.css are specific to the sample. Examine them at your leisure.
We configure Breeze in two steps
The breeze.angular.js script defines the “breeze.angular” module. We must list it among the dependencies of our application module when we create that module in app/app.js:
angular.module('app', [
    'breeze.angular',   // Breeze service
    ... other dependent modules ...
]);
That step loads the “Breeze AngularJS” module but doesn’t do anything with it yet. We have to pick the opportune moment to tell it to “configure Breeze now for the running application”.
The “opportune” moment is any convenient time before the first call to a Breeze API. In this sample, we know the first component to use Breeze is the EntityManagerFactory.
Open app/entityManagerFactory.js. This script defines the service that creates the EntityManager for the app, the EntityManager that communicates with the OData service. It begins as follows:
angular.module('app')
       .factory('entityManagerFactory', ['breeze', emFactory]);

function emFactory(breeze) { ... }
At runtime, AngularJS injects ‘breeze’ (the “breeze service”) into the factory definition function.
The ‘breeze’ service is defined in the ‘breeze.angular’ module we loaded earlier.
The act of injecting the ‘breeze’ service into any application component creates the ‘breeze’ service and triggers configuration which includes:
$q promise service.$http service.Breeze is ready for an AngularJS app but it doesn’t know we’re using OData and it doesn’t know where the service is yet.
Breeze abstracts the details of its own communications with the server into a “DataService Adapter”. The default adapter is designed for a Breeze-flavored ASP.NET Web API … which is not the same stack as the Web API 2 OData.
We must tell Breeze to use the Web API OData adapter (‘webApiOData’) like this:
// use Web API OData to query and save
breeze.config.initializeAdapterInstance('dataService', 'webApiOData', true);
Make sure you pick the ‘webApiOData’ adapter, not the generic ‘odata’ adapter. The ‘webApiOdata’ adapter is adjusted for certain peculiarities of the Web API OData implementation.
While were at it we should lock in the Breeze NamingConvention.
Most JavaScript developers write property names in camelCase (“firstName”). Most .NET developers write property names in PascalCase (“FirstName”). You shouldn’t be forced to pick one convention for both platforms. And you don’t have to. The Breeze NamingConvention.camelCase convention translates PascalCase server-side property names into camelCase client-side property names (and vice-versa). We make that the default for this application:
// convert between server-side PascalCase and client-side camelCase
breeze.NamingConvention.camelCase.setAsDefault();
You can create your own convention if you have a more complicated translation scheme.
In Breeze, the serviceName identifies the root of the service endpoint. For a Web API OData service, the serviceName is the site’s absolute URL plus the the Web OData route’s “routePrefix””. Here’s how the sample does it:
var serviceRoot = window.location.protocol + '//' + window.location.host + '/';
var serviceName = serviceRoot + 'odata/';
This yields a runtime URL such as this:
http://localhost:55802/odata/
When the app asks for a new EntityManager, we pass this serviceName to the constructor:
var manager = new breeze.EntityManager(serviceName);
The EntityManager builds request URLs from that serviceName:
http://localhost:55802/odata/$metadata
http://localhost:55802/odata/$batch
http://localhost:55802/odata/TodoLists?$orderby=Created%20desc%2CTitle&$expand=TodoItems
Not with the app of course. But that’s it for configuring Breeze. It’s ready for AngularJS and ready to talk to your Web API OData service.
The rest is HTML/JavaScript application programming with the help of AngularJS and Breeze. There are almost no differences between the way you program the application for Web API OData and the way you’d program it for a different backend. The techniques and guidance are the same.
This isn’t the place to learn about programming in AngularJS and Breeze. But we will give you a tour of the project and highlight some design decisions.
The app folder holds all application JavaScript and HTML. This application is so simple that we’ve kept the file structure flat. Here’s the inventory:
app.js - the application’s AngularJS module
commandbar.html - the view of the “Save”, “Add” and “Refresh” buttons at the top
datacontext.js - the data access layer that insulates ViewModels from data access details.
entityManagerFactory.js - configures Breeze and creates new EntityManagers (discussed above)
logger.js - a logging service that displays “toast” messages and writes to console
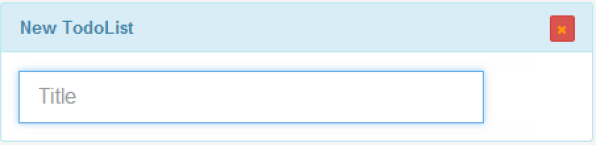
new-todolist.html - the panel view for adding a new TodoList
todolist-detail.html - the view for displaying and editing a single TodoList.
todolist-detail.js - the ViewModel (Controller) supporting the todolist-detail view
todolists.html - the master view, holding command bar, the new Todo panel, and the details views.
todolists.js - the app’s main ViewModel (Controller)
This simple app only has one “screen”, composed dynamically from an outer master View and three sub-views. Here’s the outer todolists.html - its sub-views outlined and shaded - followed by the three sub-views themselves:
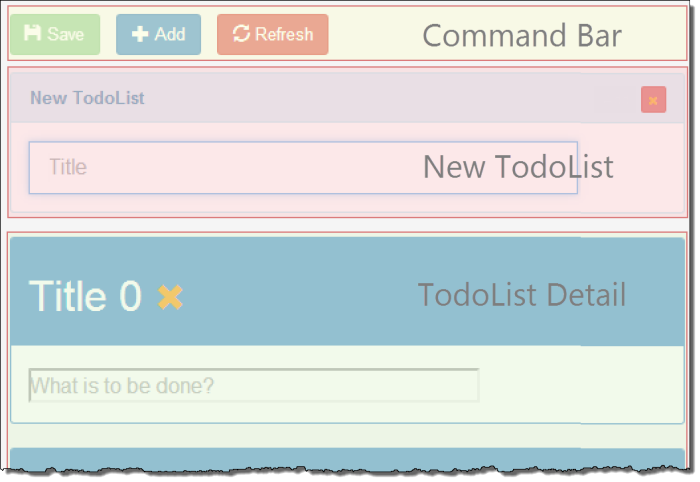
commandbar.html

new-todolist.html
todolist-detail.html
The outer todolists View and all of the sub-views are bound to a single master “ViewModel” (aka “Controller”), todolists.
We’re didn’t have to design it this way. We’re not trying to be complicated. To the contrary, we’re striving for clarity by breaking the screen into regions of screen real estate that have their own layout characteristics.
Each view has a small amount of HTML that we think is easy to understand … easier than if all of the HTML were dumped in a single file.
For example, this is the outer todolists.html:
<!---------------------------------------------------
    Master view of all TodoLists
--------------------------------------------------->
<div class="well" data-ng-controller="todolists as vm">

    <!-- Command Bar Buttons -->
    <div data-ng-include="'/app/commandbar.html'"></div>

    <!-- "New TodoList" expando -->
    <div data-ng-include="'/app/new-todolist.html'"></div>

    <!-- TodoList Content -->
    <div data-ng-repeat="todoList in vm.todoLists">
        <div data-ng-include="'/app/todolist-detail.html'"></div>
    </div>

</div>
We trust it’s easy to read this HTML at a glance.
Open app/todolists.js which defines the ViewModel (aka “Controller”) for the application.
It’s written in “Controller As” style in contrast to the older style of controller you may have seen. Notice that
$scope servicethis object in the vm variable.vm variableThe lack of the $scope service is a hallmark of the “Controller As” style. We can always inject $scope if we needed it. But we don’t need inject it when we don’t need it … and we don’t need it in this ViewModel.
We do need
$scopein the todolist-detail.js ViewModel where we require access to the todolist entity being displayed and to the parent ViewModel (todolists) that knows how to delete a TodoList. We’re happy to inject the $scope because it is useful to us. The balance of the controller adheres to the “Controller As” ViewModel pattern.
The todolists controller itself (rather than a $scope) presents the binding surface to the View. If the View were to bind to a foo property, it would bind to vm.foo, where vm is the convenience name for the controller.
You’ll find an example of this approach in todolists.html. Look for the <div> that binds to the ViewModel’s “list of TodoLists” with the expression data-ng-repeat="todoList in vm.todoLists". The vm is the controller.
Our second stylistic decision is the vm naming convention. When you see the vm identifier in the ViewModel code (or in the View HTML), you know we’re talking about this ViewModel, the one that we’re defining in this controller. It’s short, memorable, easy to write.
Our third stylistic choice is to spell out the entire ViewModel API at the top of the file in a single block of vm member assignments (sorted alphabetically).
var vm = this;
vm.addTodoList = addTodoList;
vm.changesCount = changesCount;
vm.deleteTodoList = deleteTodoList;
vm.editBegin = editBegin;
vm.editEnd = editEnd;
... more members ...
In a glance you grasp the ViewModel’s entire binding surface. This style is widely referred to as the “Revealing Module” pattern.
If you need details, you can always scroll (or search) for the implementation later in the file. Most of the time all you want to know are the features of the ViewModel and what they’re called so you can bind to them. The purpose should be clear when we name our members well.
The “Controller As” style is strictly a matter of taste. We find it easier to read and write. To us it feels truer to the Model-View-ViewModel (MVVM) pattern than the traditional $scope controller style.
The web is full of people who “hate on it”. We haven’t seen a substantive argument against it … because there can be no such argument. Whether you prefer Controller As or $scope style is, as we said, a matter of taste.
We’ve made our call. You make yours. Whatever you decide, stick to it.
The datacontext is the client-service layer that mediates between ViewModels and the remote server.
Poke around in the app/todolists.js ViewModel and you’ll see that all data access methods delegate to the datacontext. For example, getTodoLists
function getTodoLists() {
    return datacontext.getTodoLists().then(function (data) {
        return vm.todoLists = data;
    });
}
The ViewModel never talks to the server directly. That’s one of our few hard-and-fast rules. Another such rule: The ViewModel may never touch the Breeze EntityManager.
We’re strict about this separation of concerns; we suggest you adopt the same rigor.
Notice that datacontext.getTodoLists returns an object with a then(...) method. That object is a promise to call you back when the server responds, either with the query results or with an error. getTodoLists is an asynchronous method that fetches data from the server. All asynchronous methods in this application return AngularJS $q promises.
Let’s see what happens when the server replies with “TodoList” data. The promise is fulfilled triggering the ViewModel callback function which receives an array of Breeze “TodoList” entities. The callback assigns this array of entities to the ViewModel’s todoLists property. This property is bound to the todolists.html view via an ng-repeat. AngularJS detects the change to the todoLists array and presents each of its TodoLists in a separate instance of the todolist-detail.html sub-view.
Per the “Revealing Module” style, the datacontext API is spelled out at the top of the file:
var service = {
    getChangesCount: getChangesCount,
    getHasChanges: hasChanges,
    getTodoLists: getTodoLists,
    createTodoList: createTodoList,
    createTodoItem: createTodoItem,
    deleteTodoItem: deleteTodoItem,
    deleteTodoList: deleteTodoList,
    save: save
};
They’re are all short, unremarkable functions implemented later in the file. “Unremarkable” … except for “save”.
Breeze saves change-sets consisting of one or more entities, each in some changed state that indicates how the change should be persisted. Some entities may be new (‘Added’), some edited (‘Modified’), and some may be marked for deletion upon save (‘Deleted’). A batch can hold any combination of entity types and changed states.
The EntityManager.saveChanges() method commands Breeze to send the pending changes to the server all at once. The implication is that these changes will be saved as a single transaction.
In reality, the server technology determines if the change-set can be sent as a single request to be persisted atomically and transactionally.
That is not possible with Web API OData today. While OData can receive all changes in a single batch request, it processes the changes separately, re-distributing them to the individual action methods of the Web API OData controllers. Some of the batched sub-requests may succeed while others may fail. You cannot save both a new TodoList and its new TodoItems in the same batch request.
The OData team is working on a solution to these problems. Meanwhile, we have to live with it as it is.
One workaround is to save every change immediately. Create a new TodoList? Save it. Create a new TodoItem? Save it. Change a property? Save it. Delete a TodoItem save it.
However, in many real world applications, the user accumulates related changes and presses “Save” only when the task is complete. We wanted to show how you could support that workflow even if we cannot yet provide transactional guarantees.
Therefore, this sample’s save implementation takes a hybrid approach that meets the challenge. It groups pending entity changes into “safe-to-save” batches and chains these batches so that the next save starts only after the prior save finishes. Take a look at prepareSaveBatches for the details.
We look forward to revising this sample as soon as a transactional alternative becomes available.
We hope you enjoy the sample. Try the Web API OData and Breeze combination in your next application. Let us know how it goes.
Happy coding!
 Free & open source