
“todo-zumo” is a simple one-screen AngularJS Todo app that demonstrates features of a Breeze + AngularJS.
To keep your attention squarely on client development, this app can run without defining a server on your machine. By default it queries and saves data to a Microsoft Azure Mobile Services (AKA “Zumo”) back-end that is waiting for your call.
The Zumo aspect alone may be interesting to you. Alternatively, if you’re developing in a Windows environment, you can reconfigure the app to talk to an ASP.NET Web API back-end running on localhost. That server is included in this project in the todo.WebAPI folder as discussed below.
The Breeze features of particular interest are:
Querying a database with a LINQ-like syntax
Holding the queried TodoItems in cache
Add, modify and delete cached TodoItems without saving them.
TodoItem entities track their own change-state; the UI identifies unsaved changes with font colors and strikethroughs.
Saving a “change-set”, a collection of unsaved entities in various states
Automatically stashing unsaved changes to browser local storage (WIP=Work in Progress).
Re-launching the application restores WIP entities to cache before loading fresh data from the server.
Talking to a Microsoft Azure Mobile Services node.js server “in the cloud”.
Talking to a local Microsoft ASP.NET Web API2 server running Entity Framework and SQL Server.
Generating Breeze metadata via Entity Framework (Web API server only)
Defining Breeze metadata on the client instead (both servers).
The breeze scripts are not included directly in this sample. You must copy them into the sample before you run it.
Windows users can simply execute the getLibs.cmd command file which copies the files from a source directory in the samples repository into the scripts folder.
Windows may ask you to approve running this script; please do so.
Not a Windows user? It’s pretty simple.
If you want to run the Web API server variation, continue with the Web API server installation instructions below.
You’ll need to launch a web application server to host the client-side assets (HTML, CSS, JavaScript).
Open the launchers folder.
Pick the launch option appropriate to your OS and double-click to launch. For example, Windows users should choose launch-windows. The launcher opens the web server in a console/terminal window. Confirm that the server is running.
Windows may ask you to approve running this script; please do so.
Open a browser to http://localhost:8000/
The application should appear in the browser. You may have to wait a minute for Azure to revive the sleeping Mobile Service instance; subsequent browser refreshes will be quite crisp.
When the data are loaded. You can start adding, modifying and deleting TodoItems. It might look like this:
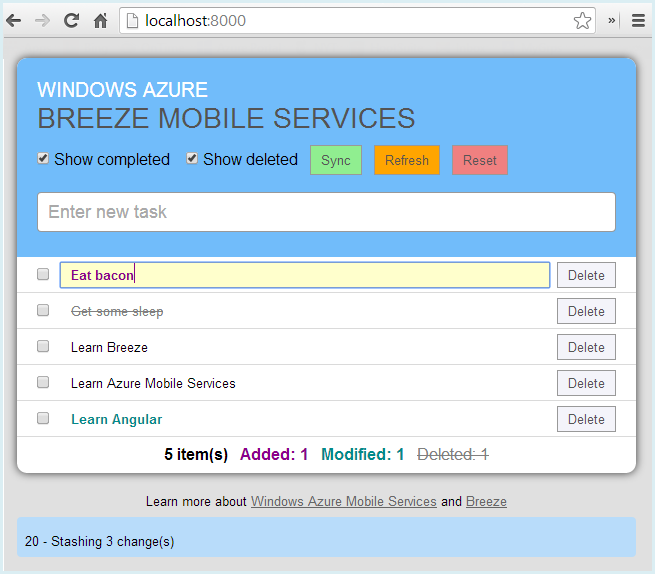
Notice that
The “Show completed” and “Show deleted” checkboxes are checked so that you can see these TodoItems in the list.
Unsaved TodoItems are color-coded: added, modified, and deleted
The counts in the status line summarize the status of all entities in cache whether or not they are visible in the list.
Messages with a blue background appear below the main display when the app moves WIP entities into and out of browser storage. They fade away after a few seconds.
Red error messages (not shown) appear below the blue WIP messages when something goes wrong … such as trying to save a TodoItem that has no description.
If you’re on a Windows .NET 4.5 machine you can reconfigure the app to talk to a local ASP.NET Web API service.
You’ll have to build ASP.NET Web API server first before re-targeting the application to that server. Here’s how:
You can run this server in Visual Studio, either with or without debug. But you don’t have to. Once built, you can close Visual Studio and you needn’t open it again. Instead, do as follows:
Open the launchers folder.
Double-click launch-webapi. This opens the Web API data server in a console window. Confirm that the server is running on localhost:58066.
Test that all is well by pasting http://localhost:58066/breeze/todos/todoitem into a browser address bar. The browser should display TodoItem JSON.
Now we’ll reconfigure the application to target the Web API
Open an editor such as Sublime or your favorite IDE
Navigate to the app folder.
Open config.js
Change line #10 to useZumo=false and save
Launch the web server if it isn’t already running by double-clicking launch-windows which opens the Web application server in a console window. Confirm that this server is running on localhost:8000.
At this point you have two command windows open: the Web API data server on port 58066 and the web app server on port 8000.
Open or refresh the browser at localhost:8000.
It should look something like this:
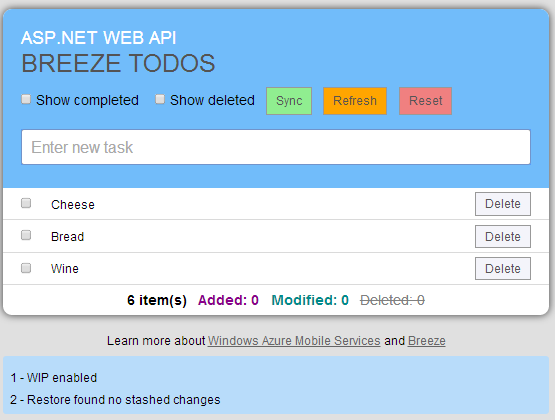
Unlike the Azure version, the Web API version expects the server to generate the Breeze metadata (from the Entity Framework model). If you inspect the network traffic, you’ll see that the app made a metadata request: http://localhost:58066/breeze/todos/Metadata.
You can configure the app to use metadata defined on the client instead.
Scroll down in config.js until you get to configureForWebApi
Set hasServerMetadata to false.
Save the change, then refresh the browser.
Look at the network traffic; you should not see a metadata request.
Now the application uses metadata defined on the client in model.js
Note that Azure Mobile Services cannot generate metadata and so that version of the application must always use the client-defined metadata.
The TodoItem entity only has three properties so it’s pretty easy to write and read the metadata by hand:
var entityType = {
    name: "TodoItem",
    defaultResourceName: "TodoItem",
    dataProperties: {
        id:       { type: DT.Guid },
        text:     { max: 50, required: true  },
        complete: { type: DT.Boolean, required: true }
    }
};
 Free & open source