Breeze entities can be adapted to suit your preferred modeling framework. The Car Bones sample illustrates Breeze entities adapted for Backbone, one of the more popular JavaScript Model-View-Controller (MVC) frameworks. You'll find the code for Car Bones among the samples in the full download.
The Car Bones app presents cars and their options on a single screen. You can edit a Car entity, retrieve its Options, and edit the Options individually and you can save your changes.
The key technical points:
The sample illustrates other Breeze features of a simple application
Launch the solution and press Ctrl-F5 to build and run it without the debugger. A browser opens and after a brief delay to build and initialize the database, the browser displays this screen:
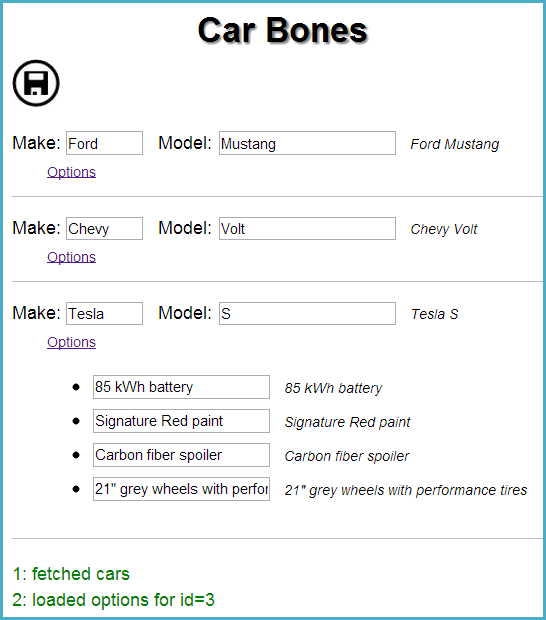
Enter changes in the Car textboxes; note that as you type your keystrokes are propagated to the italicized texts to right of the textboxes. Clicking the "Options" link fetches a Car's related options from the server; clicking a second time hides the Options; click again to reveal them. The application only loads the Options the first time; all subsequent displays are showing cached data.
Save changes by clicking the upward pointing arrow icon at the top of the screen.
Every server operation is logged to the screen in the message area at the bottom.
Adding, deleting, and querying (other than the first query) are out-of-scope. Look to one of the other samples such as "Todo" to learn about those techniques. This sample concentrates on enabling a Breeze Backbone client.
Car Bones began as an empty MVC4 project. With NuGet, we added the usual jQuery, Modernizr, EntityFramework SQL Server CE, and the base Breeze package, "Breeze.MVC4WebApi". Then we added the backbone.js the NuGet package which adds the dependent underscore.js package. Then we dragged in a copy of the backbone.stickit.js, a model-view binding plugin for backbone. We'll explain stickit below.
The Car Bones server is typical of a Breeze sample application. There's a CarBonesController, a Breeze Web API controller talking to an Entity Framework DbContext (CarBonesContext). The DbContext exposes DbSets for Cars and Options. The controller API has IQueryable Cars and Options methods.
Car and Option are the two model entity types, written in "Code First" style. A Car has an Options navigation property which returns its child Options . An Option has a Car property that returns its parent Car.
A CarBonesDatabaseInitializer (re)creates the database each time the server starts, populating it with the sample data (3 cars and their options).
The Car Bones client is an Index.cshtml file and three application JavaScript files. The architectural style is Model-View-Controller (MVC).
Index.cshtml is the single web page that serves as the application shell. A "content" <div/> defines the lone application View. Controller code will insert rendered templates, bound to cars and their options, into that <div/>. Below that <div/> are two templates, car-template and option-template, wrapped with inert <script/> tags.
At the bottom of file are 3rd-party library scripts followed by the three scripts that comprise the client application.
logger.js is a diagnostic script, called by other components when they log activity messages to the message area at the bottom of the screen.
dataservice.js is the mediating layer between the viewcontroller and the application's Breeze code. You'll want to study this script. It demonstrates configuring Breeze to use backbone and the Web API, querying data, and saving changes.
Most of our samples are configured for Knockout. This sample is configured explicitly for backbone and the ASP.NET Web API as follows:
    breeze.config.initializeAdapterInstances(
        { modelLibrary: "backbone", dataService: "webApi" });
Otherwise, this dataservice looks and behaves much like a dataservice configured for any other framework. You query and save in the same manner with the same syntax. Backbone reveals itself most clearly when you access an entity property. Instead of working with Knockout observable functions, you call get and set properties. Here's what we mean:
logger.success("..." + car.id());               // Knockout style
logger.success("..." + car.getProperty("id"));  // backbone style
CarBones is configured for the "camel case" NamingConvention.
// Declare the camel case name convention to be the norm
entityModel.NamingConvention.camelCase.setAsDefault();
This means we can follow the JavaScript naming conventions while on the client and retain the C# conventions on the server:
  someCar.Make; // C#
  someCar.make: // JavaScript
viewcontroller.js defines the main application controller and its backbone sub-controllers. It starts the app rolling. It defines two backbone Views (which are in fact controllers ... confusing but true), the CarView and the OptionView. These controllers acquire model objects (Cars and Options) by querying with the dataservice and then bind those objects to HTML controls in Index.cshtml.
Binding to entities built with backbone is quite different from binding entities built for Knockout. CarBones relies for binding on a backbone extension library called stickit ... to which we turn next.
Most Backbone developers expect to bind Backbone models to either underscore templates or Handlebars templates. You are welcome to do that. We tried both ... and were frustrated. These templating choices are fine for one-way binding from the model properties to the controls on the screen. But most developrs build Breeze apps that accept user input ... and a lot of it. That means data entry also flows from the controls back to the model properties.
We are used to two-way data binding frameworks such as Knockout that coordinate flows both to and from the HTML controls. Backbone is good with pushing data into controls through the templates. It doesn't do a thing to help you get data from the controls back into the model objects. You have to hook up events to the controls to learn of user entry yourself. And you have to write code to extract the data from those controls and set the model properties. This is a lot of tedious, error prone work. We're not knocking backbone; we are saying that it isn't well suited for that kind of user interaction.
Fortunately, someone agreed and wrote backbone.stickit, a two-way binding framework that's easy to learn and easy to use.
You'll probably want to go beyond what we do in Car Bones which uses the simplest form of stickit binding. As with most binding frameworks, you write an HTML template in which you declare binding points in the template syntax. Stickit only has one binding point: the HTML "id" attribute. Here's the entire template for an Option.
<script id="option-template" type="text/x-template">
    <li>
        <input id="name-input">
        <span id="name-desc" class="description"/>
    </li>
</script>?
As is typical of client-side templates, the <script/> tag surrounds some HTML that defines the layout for an object, a Car Bones Option in this case. The <script/> tag is just a clever way of preventing the browser from displaying that template. We want to use the template, not display it.
This template only has two slots: the input texbox with id="name-input" and the span with id="name-desc". When rendered it looks like this:

That template defines what we would call the "View" - the surface seen by the user, the controls the user manipulates with keyboard, mouse and touch. In the viewcontroller.js you'll find the following line that uses jQuery to pull the HTML out of the <script/> tag and make it available as a JavaScript string.
var optionTemplateSource = $("#option-template").html();
Now that we have the template within the code, we're ready to use it in data binding.
In an MVC architecture, a Controller coordinates the View, represented by the template, with a Model object that holds the data. That controller class in Backbone is called View (confused? so were we).
Here is half of the code that defines the OptionView controller:
var OptionView = Backbone.View.extend({
    bindings: {
        '#name-input': 'name',
        '#name-desc': 'name'
    },
    ...
});
If you know Backbone, you know that the "bindings" member is not a native property of a Backbone View class. The "bindings" is stickit's extension to the backbone View class.
The bindings member defines binding relationships between slots in a template and properties of a data object. This particular bindings object has two properties, "#name-input" and "#name-desc". You probably recognize these as CSS selectors that match the "Id" attributes in the template.
These bindings property values - both 'name' - identify the Option property to which the matching control should be bound. Of course the Option model object has a 'name' property. Evidently we are binding both the textbox and the span to the same Option 'name' property.
Notice that instead of inscribing the binding declaration in the HTML, as one does in underscore, HandleBars, Knockout, and most other templating frameworks, stickit declares its bindings in code.
Here's the rest of the OptionView, the part that renders an Option model instance:
var OptionView = Backbone.View.extend({
    bindings: {...
    },
    render: function () {
        this.$el.html(optionTemplateSource);
        this.stickit();
        return this;
    }
});
The OptionView's "render' method, when called by backbone, constructs a DOM-ready element ($el) from the template source described above. Then stickit "sticks" the jproperty values of the bound Option into the prescribed slots of the DOM-ready element.
Elsewhere, in viewcontroller.js you'll find code that builds up DOM-ready elements, brick-by-brick, inside-out, using this same technique. Eventually, you get to a line that plugs the final elements into the browser DOM. Here is a schematic code snippet showing how that happens.
var content = $("#content"); // the slot in the Index.cshtml where we put the composed result
...
cars.forEach(
    function(car) {
           ...
           content.append(view.render().el); // render the view and put it on screen
    });
    ...
}
We saw how stickit fills a DOM-ready element, built from a template. We saw backbone render the view and used jQuery to push the rendered elements on to the screen. That's one-way binding.
Stickit also listens to events on the bound controls. For example, as the user enters data into the Option name textbox, stickit propagates the user's keystrokes back to the Option object's name property. The updated name property (which is observable) triggers another event. stickit hears that event, and propagates the changes to the <span>. The circle is complete.
You can see this for yourself by adding and removing characters in the Options textbox.
 Free & open source